In this post, I’ll walk you through solving the “Investigating Web Attacks Challenge” from Let’s Defend. The challenge uses logs sourced from the bWAPP web application, an intentionally vulnerable web app designed to help security professionals practice identifying and analyzing real-world attack patterns. In this guide, I’ll show you how I analyzed the logs to answer each question.
Question: 1. Which automated scan tool did the attacker use for web reconnaissance?
During the first phase of the attack, I needed to identify which scanning tool the attacker used. To do this, I reviewed the web server logs, paying attention to unusual User-Agent strings, which often provide clues about automated tools used.
I scrolled through the logs searching for odd patterns, and also used the following grep command from a Linux console to speed up the search:
grep 'Mozilla/5.0' access.log | sort | uniq -c | sort -nr
Upon reviewing the logs, at line 30 I found Nikto in the User-Agent string, indicating that the attacker used Nikto, a popular web vulnerability scanning tool.
Answer: Nikto

Question:2. After web reconnaissance, which technique did the attacker use for directory listing discovery?
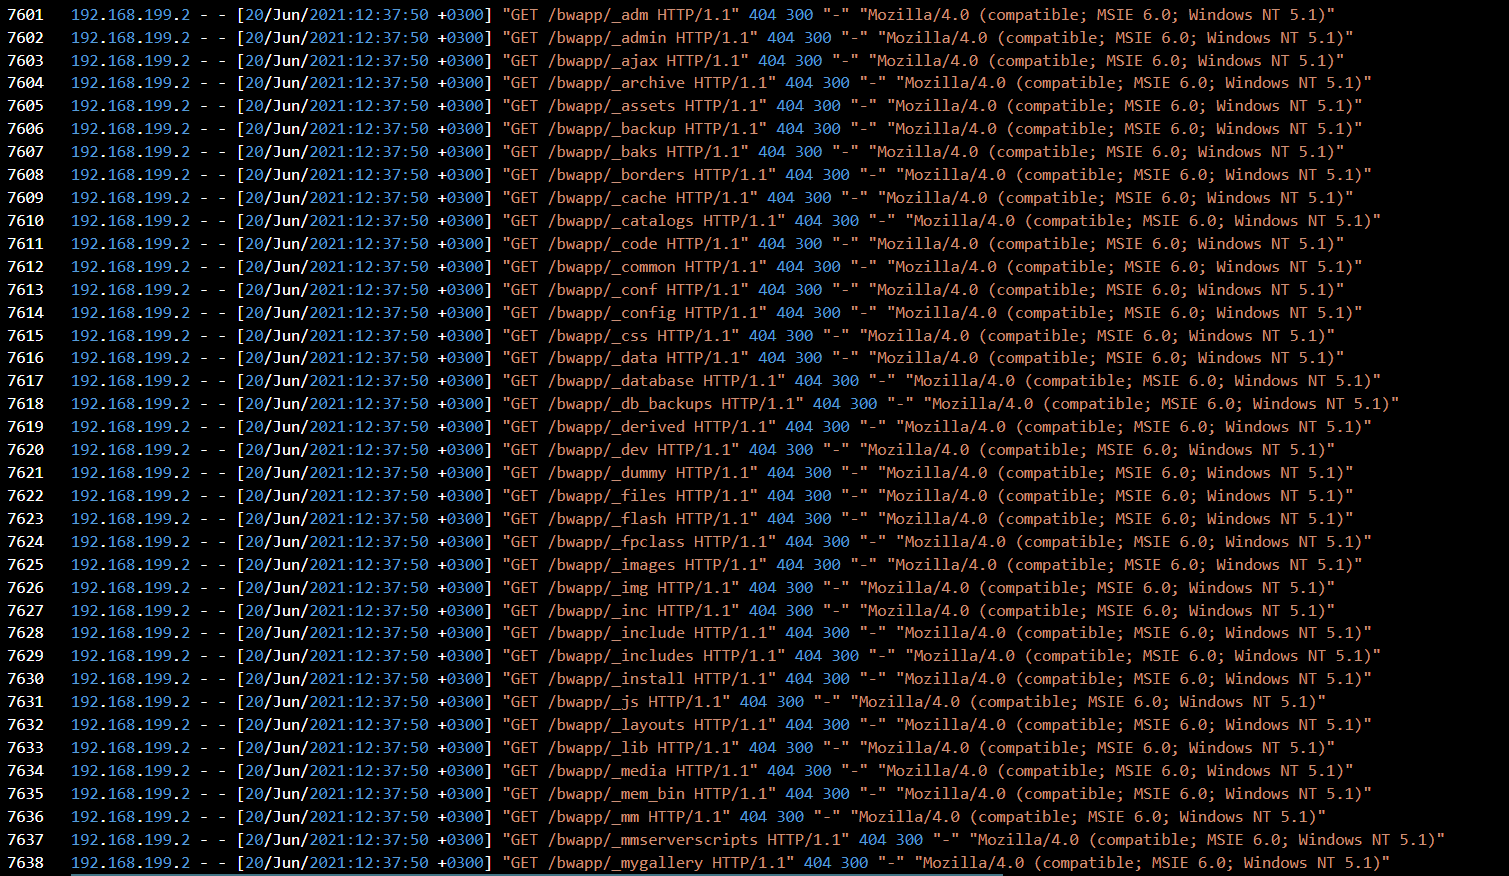
Next, I needed to determine how the attacker moved from reconnaissance to probing the web application further. The Nikto User-Agent strings seemed to go on forever. I used the below grep command to help me fast track to the tail end of the “Nikto” scanning (line 7567):
grep -n "Nikto" access.log | tail -n 1


Continuing my review of the logs, I noticed that the attacker was attempting to enumerate various directory paths. The paths were checked in alphabetical order, with many resulting in HTTP 404 (Not Found) responses, a classic sign of directory brute forcing.
Directory brute forcing typically involves automated tools guessing directory names, often leading to many 404 Not Found errors. This enumeration behavior was evident in the log patterns.
Answer: directory brute force
Question:3. What is the third attack type after directory listing discovery?
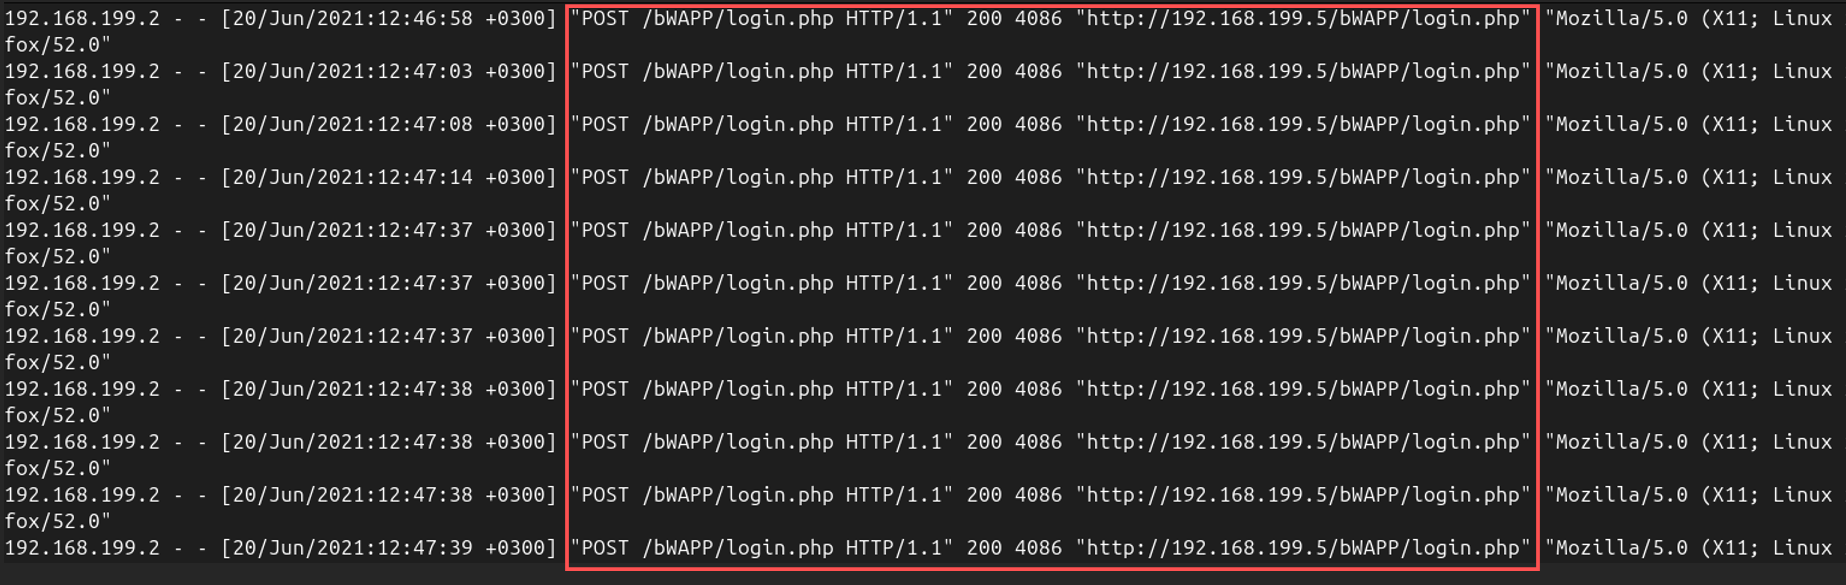
After directory brute force, the attacker proceeded to a new phase of the attack. Looking at the logs, I noticed multiple POST requests to the /login.php page, suggesting that the attacker was attempting a brute-force login attack.
The logs showed repeated POST requests to /bWAPP/login.php with the same User-Agent string and no changes in parameters. This behavior is consistent with brute-forcing credentials.
Answer: brute force
Question: 4. Is the third attack successful? The third attack, the brute-force login attempt, was indeed successful. We can confirm this because the HTTP status codes changed from 200 OK to 302 Found, indicating that the attacker was successfully redirected to another page (portal), likely after a successful login. In addition, the significant increase in the size of the response is a telltale sign of a successful attack.
Answer: Yes

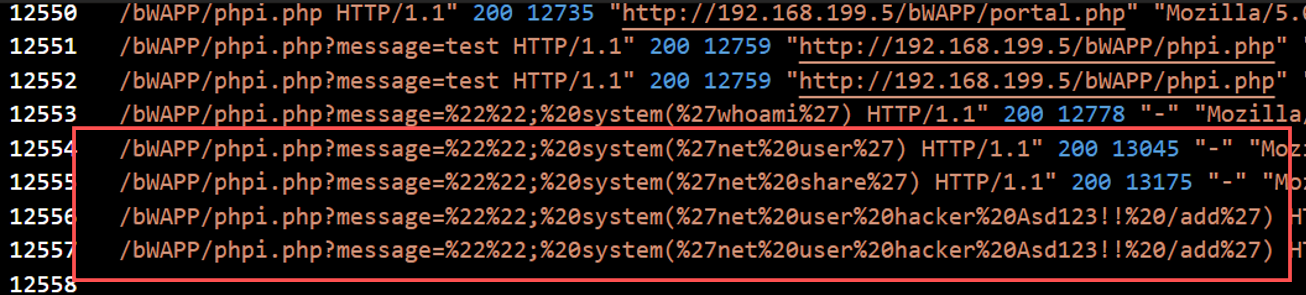
Question:5. What is the name of the fourth attack? After the successful brute force attack, the attacker moved on to the next phase: code injection. This is evident from the logs, where the attacker began passing system commands to the web application.
The logs show the attacker executing commands like whoami by injecting them into a URL parameter.
Answer: Code injection

Question: 6. What is the first payload for the fourth attack? The first command that the attacker injected into the vulnerable application was whoami, a common command used to identify the current user on a system.
The attacker sent the whoami command to the vulnerable phpi.php script to gain information about the system.
Answer: whoami

Question: 7. Is there any persistency clue for the victim machine in the log file? If yes, what is the related payload? The attacker attempted to establish persistence on the victim machine by creating a new user account. The log shows the attacker issuing a command to add a new user named hacker with the password Asd123!!.
The attacker used the following payload to create the new user:
system('net user hacker Asd123!! /add')
This command is a clear attempt to maintain access to the machine by adding a new user account that can be used later for logging back in. The attacker can further secure persistence by executing an additional command to add this user account to the administrator group.
Answer: %27net%20user%20hacker%20Asd123!!%20/add%27
By analyzing the logs step by step, I determined that the attacker used Nikto for reconnaissance, followed by directory brute forcing and a brute force login attack. After gaining access, they attempted code injection and aimed to establish persistence by creating a new user account.
This challenge demonstrates the importance of monitoring web server logs for suspicious activity and how attackers can chain together multiple vulnerabilities to compromise a system.
This walkthrough should help you approach the “Investigating Web Attacks Challenge” on Let’s Defend with confidence!